Variable Frequency Drive Setup
In this paper a description is given how to set up the parameters for use the motor with a standard induction motor. Lot of this is based on the operating instructions manual that is available from Gozuk. This guide gives an explanation of how to set up the variable frequency drive (VFD) for any induction motor. The slide adaptations that are made in this setup description are because at a University the variable frequency drive is used for a specific motor and this made it possible to narrow and/or specify the original manual where the information to vague and include extra notes based on the problems that occurred during the installation of the variable frequency drive to the motor at the university. The first part of the description handles about the hardware configuration, first the fixed hardware and second the set up of the motor and control items. Where needed pictures are included to explain the process. The second part of this setup description gives a look on the different parameters in the variable frequency drive; what they mean, how to adapt them and what the possibilities are. This setting up description doesn't include actual experiments, just how the configurations are made before beginning the experiments.
Hardware
Fixed hardware
The variable frequency drive is mounted on a wooden plate with several hardware elements. This ensures an easier and safer handling of the variable frequency drive - motor combination. From mains coupling to motor coupling there are following elements:

Mains coupling
The mains coupling is a three phase plug: 16A 5 pin 230/400V phase inverter plug. This means 3 phase pins, 1 neutral pin (6h) and 1 earth pin. It has an IP 44 safety degree. On the plug a cable 5G2,5 is connected.

Main switch
The main switch ensures a secure switch between the mains and the downstream components. It is a switch covered in a Telemecanique box with IP55 safety degree (what is IP rating?). It is a three pole switch. The earth is linked through to the other end and the neutral isn't connected. Inside the cover the neutral connection is terminated safely. From the switch a cable 4G1,5 leads to the next components, the automatic fuses.
Automatic fuse
The automatic fuses are two double pole! automatic fuses G10A 220/380V AC. One of the three phase wires is connected through both automatic switches. This gives not the same result as a three pole automatic fuse but it guarantees a higher safety than the one pole automatic fuses. The earth is o1f course linked directly to the variable frequency drive. From the automatic fuses a cable 3G1,5 leads to the mains connection of the VFD.
Variable Frequency Drive
The frequency has several power connections and control connections. The power inputs consist of the 3G1,5 cable which is connected to a plug: 'L1 L2 L3'. The power out has different functions. Of course there is the three phase output plug for the induction motor: 'UVW'. Besides that there is a connection for the brake resistor and for the DC link/ interstage: plug '-DC+DC-R+R'. There is the possibility to connect two relays which can switch 220V but they are not connected in our set-up. There are 18 thin, red wires connected for the analogue and digital inputs. The whole variable frequency drive is connected with the earth through the non interruptible mains earth. On top of the variable frequency drive there is a digital screen for setting parameters or control values. The display can be removed but that isn't useful here. Furthermore there is a cover to shield the analogue and digital inputs. This cover can also be removed but because all possible connections are brought outside the variable frequency drive this can stay fixed. Figure In the cover there is a hole for the USB cable.

Figure 4: (a) Top VFD; (b) power connections; (c) inputs
Digital and analogue inputs (Figure 5. a)
The digital and analogue inputs are connected through the red wires with 16 green plugs. These are numbered like the internal numbering that also can be found in the design guide. The numbering is done on paper labels which are fixed with tape.

Figure 5. (a) Digital and analogue inputs; (b) safety stop; (c) pulsed start/stop buttons
Safety stop (Figure 5. b)
The safety stop is actually one of the digital inputs. This is a normally closed safety button. Whatever is setup in the parameter list, if this button is pushed, the connection between motor and variable frequency drive is interrupted and the motor bells. After pushing the button has to be turned to reach the closed state. After that the detected interruption has to be reset on the variable frequency drive. There is also a connection on the green plugs to install an additional safety stop. This should be connected in series but isn't. This is important to know because if a bridge is made between plug 12 and 37 the safety stop is disabled.
Push buttons (Figure 5. c)
There are two push buttons with a light mounted on the plate. This is done because often the pulsed start-stop is used to start and stop the motor. The light can be connected to indicate a state of the buttons.
USB cable
The USB cable has normally not to be disconnected from the variable frequency drive. It is a standard USB-A to USB-B cable, male to male where the B connection fits the variable frequency drive USB input and the A connection a standard 2 .. 0 computer USB gate.
Output plugs
There are 8 output plugs mounted on an aluminium bar on the plate. The row of three red plugs are the power outputs for the motor. The yellow plug is an earth connection via the variable frequency drive and is uninterruptible. The blue connections are for an external brake resistor and the black and red plugs on the side or for a DC-coupling with the DC interstage.

Adjustable hardware
In the most experiments the same adjustable hardware components are used. These are not mounted on the plate because their size or use.

Figure 7. Adjustable hardware: (a) potentiometer; (b) resistor; (c) push buttons
Potentiometer (Figure 7. a)
The potentiometer is used to control the speed of the motor analogous. The standard value of the potentiometer maximum resistance is 1 kΩ but other values can be used when parameters in the variable frequency drive are changed.
Resistors (Figure 7. b)
External resistors can be connected to dissipated energy that is regained from the motor when braking. The standard resistor value is 273 ohm. Other values of the resistance can be used when other brake times are needed. If the deceleration has to be fast, the resistance will be low and the current high. This is important to know when selecting a brake resistor.
Push buttons (Figure 7. c)
Two normal open push buttons can be used to create a digital speed regulation. One button will increase the speed of the motor as long as it is pushed; the other button will decrease the speed.
Software
The software that is used to control the VFD via a PC is the program MCT (Motion Control Tool). When using the free version, one has several limitations but this isn't a real drawback for use in the electric laboratory of the University. In the software all the adjustable parameters can be changed and the nonadjustable can be seen. Also there is the possibility to make two measurements in time of any parameter. This measurement is showed real time on a graph in the program and can be exported to external programs such as Excel to make own analysis.
The motor is a standard induction motor with following nameplate:
The motor is best connected in star configuration.

Step 1. Locate the motor name plate
Step 2. Enter the motor name plate data in this parameter list.
To access this list first press the [QUICK MENU] key then select "Q2 Quick Setup"
Step 3. Activate the Automatic Motor Adaptation (AMA)
Performing an AMA will ensure optimum performance. The AMA measures the values from the motor model equivalent diagram.
Par. 3-02 Minimum reference / Par. 3-03 Maximum reference
Par. 4-11 Motor Speed Low limit [RPM] or par. 4-12 Motor Speed Low Limit [Hz] / Par. 4-13 Motor Speed High Limit [RPM] or par. 4-14 Motor Speed High Limit [Hz]
Par. 3-41 Ramp 1 Ramp up Time / Par. 3-42 Ramp 1 Ramp Down Time
Hardware
Fixed hardware
The variable frequency drive is mounted on a wooden plate with several hardware elements. This ensures an easier and safer handling of the variable frequency drive - motor combination. From mains coupling to motor coupling there are following elements:
Mains coupling
The mains coupling is a three phase plug: 16A 5 pin 230/400V phase inverter plug. This means 3 phase pins, 1 neutral pin (6h) and 1 earth pin. It has an IP 44 safety degree. On the plug a cable 5G2,5 is connected.
Main switch
The main switch ensures a secure switch between the mains and the downstream components. It is a switch covered in a Telemecanique box with IP55 safety degree (what is IP rating?).
It is a three pole switch. The earth is linked through to the other end and the neutral isn't connected. Inside the cover the neutral connection is terminated safely. From the switch a cable 4G1,5 leads to the next components, the automatic fuses.Automatic fuse
The automatic fuses are two double pole! automatic fuses G10A 220/380V AC. One of the three phase wires is connected through both automatic switches. This gives not the same result as a three pole automatic fuse but it guarantees a higher safety than the one pole automatic fuses. The earth is o1f course linked directly to the variable frequency drive. From the automatic fuses a cable 3G1,5 leads to the mains connection of the VFD.
Variable Frequency Drive
The frequency has several power connections and control connections. The power inputs consist of the 3G1,5 cable which is connected to a plug: 'L1 L2 L3'. The power out has different functions. Of course there is the three phase output plug for the induction motor: 'UVW'. Besides that there is a connection for the brake resistor and for the DC link/ interstage: plug '-DC+DC-R+R'. There is the possibility to connect two relays which can switch 220V but they are not connected in our set-up. There are 18 thin, red wires connected for the analogue and digital inputs. The whole variable frequency drive is connected with the earth through the non interruptible mains earth. On top of the variable frequency drive there is a digital screen for setting parameters or control values. The display can be removed but that isn't useful here. Furthermore there is a cover to shield the analogue and digital inputs. This cover can also be removed but because all possible connections are brought outside the variable frequency drive this can stay fixed. Figure In the cover there is a hole for the USB cable.
Figure 4: (a) Top VFD; (b) power connections; (c) inputs
Digital and analogue inputs (Figure 5. a)
The digital and analogue inputs are connected through the red wires with 16 green plugs. These are numbered like the internal numbering that also can be found in the design guide. The numbering is done on paper labels which are fixed with tape.
Figure 5. (a) Digital and analogue inputs; (b) safety stop; (c) pulsed start/stop buttons
Safety stop (Figure 5. b)
The safety stop is actually one of the digital inputs. This is a normally closed safety button. Whatever is setup in the parameter list, if this button is pushed, the connection between motor and variable frequency drive is interrupted and the motor bells. After pushing the button has to be turned to reach the closed state. After that the detected interruption has to be reset on the variable frequency drive. There is also a connection on the green plugs to install an additional safety stop. This should be connected in series but isn't. This is important to know because if a bridge is made between plug 12 and 37 the safety stop is disabled.
Push buttons (Figure 5. c)
There are two push buttons with a light mounted on the plate. This is done because often the pulsed start-stop is used to start and stop the motor. The light can be connected to indicate a state of the buttons.
USB cable
The USB cable has normally not to be disconnected from the variable frequency drive. It is a standard USB-A to USB-B cable, male to male where the B connection fits the variable frequency drive USB input and the A connection a standard 2 .. 0 computer USB gate.
Output plugs
There are 8 output plugs mounted on an aluminium bar on the plate. The row of three red plugs are the power outputs for the motor. The yellow plug is an earth connection via the variable frequency drive and is uninterruptible. The blue connections are for an external brake resistor and the black and red plugs on the side or for a DC-coupling with the DC interstage.
Adjustable hardware
In the most experiments the same adjustable hardware components are used. These are not mounted on the plate because their size or use.
Figure 7. Adjustable hardware: (a) potentiometer; (b) resistor; (c) push buttons
Potentiometer (Figure 7. a)
The potentiometer is used to control the speed of the motor analogous. The standard value of the potentiometer maximum resistance is 1 kΩ but other values can be used when parameters in the variable frequency drive are changed.
Resistors (Figure 7. b)
External resistors can be connected to dissipated energy that is regained from the motor when braking. The standard resistor value is 273 ohm. Other values of the resistance can be used when other brake times are needed. If the deceleration has to be fast, the resistance will be low and the current high. This is important to know when selecting a brake resistor.
Push buttons (Figure 7. c)
Two normal open push buttons can be used to create a digital speed regulation. One button will increase the speed of the motor as long as it is pushed; the other button will decrease the speed.
Software
The software that is used to control the VFD via a PC is the program MCT (Motion Control Tool). When using the free version, one has several limitations but this isn't a real drawback for use in the electric laboratory of the University. In the software all the adjustable parameters can be changed and the nonadjustable can be seen. Also there is the possibility to make two measurements in time of any parameter. This measurement is showed real time on a graph in the program and can be exported to external programs such as Excel to make own analysis.
Motor and VFD setup
The motor is a standard induction motor with following nameplate:
|
AC ~3F 50/60Hz |
IEC34 IP55 |
|
MT90524-4 |
temp.cl. F (new name AA092001ASA) |
|
Pm: 1,1/1,3 kW |
RPM: 1410/1700 |
|
U: 380-420/440-480 V Y |
I: 2,9/2,8 A |
|
U: 220-240/2S0-280 V △ |
I: 5/4,8 A |
|
No. MK110020-5 |
COSφ: 0,73/0,79 |
The motor is best connected in star configuration.
Step 1. Locate the motor name plate
Step 2. Enter the motor name plate data in this parameter list.
To access this list first press the [QUICK MENU] key then select "Q2 Quick Setup"
Step 3. Activate the Automatic Motor Adaptation (AMA)
Performing an AMA will ensure optimum performance. The AMA measures the values from the motor model equivalent diagram.
- Connect terminal 37 to terminal 12 (if terminal 37 is available).
- Connect terminal 27 to terminal 12 or set par. 5-12 Terminal 27 Digital Input to "No function".
- Activate the AMA par. 1-29 Automatic Motor Adaptation (AMA).
- Choose between complete or reduced AMA. If a sine wave filter is mounted, run only the reduced AMA, or remove the sine wave filter during the AMA procedure.
- Press the [OK] key. The display shows "Press [Hand on] to start".
- Press the [Hand on] key. A progress bar indicates if the AMA is in progress.
- Press the [OFF] key, the VFD enters into alarm mode and the display shows that the AMA was terminated by the user.
- The display shows "Press [OK] to finish AMA".
- Press the [OK] key to exit the AMA state.
- The VFD enters into alarm mode.
- "Report Value" in the [Alarm log] shows the last measuring sequence carried out by the AMA, before the VFD entered alarm mode. This number along with the description of the alarm will assist you in troubleshooting. If you contact Gozuk for service, make sure to mention number and alarm description.
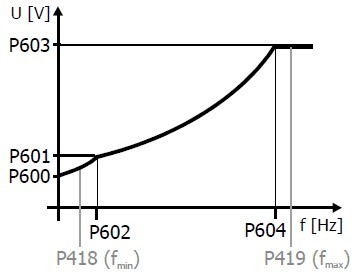
Par. 3-02 Minimum reference / Par. 3-03 Maximum reference
Par. 4-11 Motor Speed Low limit [RPM] or par. 4-12 Motor Speed Low Limit [Hz] / Par. 4-13 Motor Speed High Limit [RPM] or par. 4-14 Motor Speed High Limit [Hz]
Par. 3-41 Ramp 1 Ramp up Time / Par. 3-42 Ramp 1 Ramp Down Time
Post a Comment:
You may also like:
Featured Articles
What is VFD, How it works? - VFD ...
 VFD is shorted for Variable Frequency Drive (also known as AC Drives and Inverters) -- that's used to make an AC motor working in ...
VFD is shorted for Variable Frequency Drive (also known as AC Drives and Inverters) -- that's used to make an AC motor working in ...VFD: Insulated Gate Bipolar Transistor ...
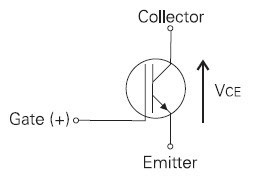 IGBT (insulated gate bipolar transistor) provides a high switching speed necessary for PWM VFD operation. IGBTs are capable of ...
IGBT (insulated gate bipolar transistor) provides a high switching speed necessary for PWM VFD operation. IGBTs are capable of ...Three phase inverters
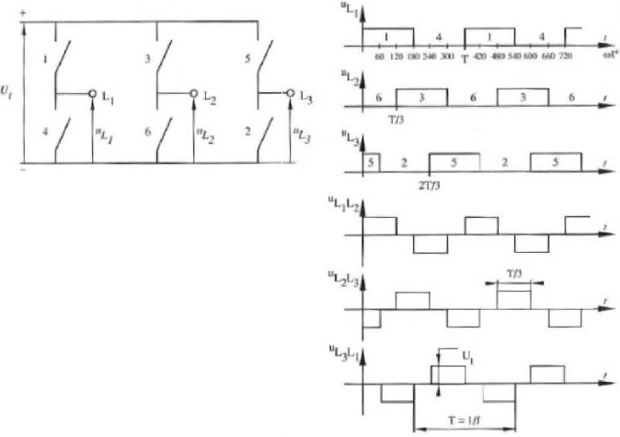 In the variable frequency drive rectifier paper, it explains how to go from three phase alternating current voltage to a direct ...
In the variable frequency drive rectifier paper, it explains how to go from three phase alternating current voltage to a direct ...Variable Frequency Drive Harmonics and ...
A discussion of the benefits of variable frequency drives often leads to a question regarding electrical harmonic distortion ...
Variable frequency drive Energy saving
 Energy can be saved in a VFD by reducing the losses in the electric motor or by reducing the energy consumption of the variable ...
Energy can be saved in a VFD by reducing the losses in the electric motor or by reducing the energy consumption of the variable ...
VFD manufacturers